Showing posts with label Baking Recipes. Show all posts

Friday, 26 April 2013

Recipe for Pizza


Pizza is an all-time favourite among kids and teenagers. This slightly Indianised
version of Pizza will sure become a great hit among everyone in the family. Try and
enjoy, and… don’t forget to give your feedback.


Singapore Chettinad Recipes
Golden Crust with melted Cheese!
 
  
Mini Pan Pizza!
 
  
Medium Size Pizza! (8 inch)


Ingredients:

 
Bread Flour – 1 Cup

Plain Flour/Maida – 1 Cup

(This will yield 1 large thin-crust Pizza (or) 2 pan Pizzas)

Olive Oil – 2 to 3 tbsp.
Or

Butter – 40g

(If it is salted butter, avoid salt)

Sugar – 2 1tsp.

Instant Yeast – 1 tsp.

(Preferably DHL Yeast)

Salt – ½ tsp.

Warm water – ½ to 1 Cup

Finely Chopped Garlic – 2 cloves

Finely chopped & deseeded Green Chilli – 1

Dried Parsley flakes – ½ tsp.

Italian herb mixture – 1 tsp.

(Or) Oregano – ¼ tsp.


Toppings:

 
 Veggie Mix
 
Thin Crust! (before rising)


With Pineapple Topping!


 Toppings for a Medium sized Pizza
 
  
 Mini Pizza (slightly over 6 inch)
 
 
More Cheese for Kids! 
 
 
Mozzarella Cheese - as required

Olive oil (to brush) - 1 tsp.

Prego Pasta Sauce – 1 tbsp.

Preferred Veggie mixture

(Options are endless – to name a few, Capsicum/Bell pepper/deseeded firm Tomato/Onion/Button Mushroom/pickled Olives/diced Pineapples, etc.)

Pineapple gives a lovely flavour and tangy taste to the Pizza.


Method:

In a large bowl, combine sifted bread flour and plain flour, along with salt, sugar, herb mixture, parsley flakes and instant yeast. (Sometimes, instead of parsley flakes I use to add freshly chopped Coriander leaves, which adds a lovely flavour) If using butter, rub in butter with the flour before adding water.  If using Olive Oil, pour olive oil and combine well before adding warm water. Make a well at the centre and pour warm water little by little and knead it into smooth dough.  Keep kneading until it becomes soft and elastic.  Cover it with a towel or plastic wrap and leave it to rise.  It may take an hour or more for the dough to double-up in size.  After it doubles up, to let out the air, punch it down with your fist and knead again briefly.  Then roll it and spread in a Pizza pan, if making 2 pan Pizzas, divide the dough accordingly.  Cover it with a towel and leave it in a warm place for 2nd rising.  It may take half-an hour or more according to the climate. 

 Preheat Oven to 180◦C (or) 380◦F

 Now, it’s the time for making the toppings.  Brush it with olive oil and spread the sauce.  Spread the cheese and veggies.  If you like, sauté veggies lightly with a pinch of salt before you spread.

If you prefer it to be spicy add a ¼ to ½ teaspoon of paprika/crushed dried chilli to the vegetables.

When the oven is ready, bake the pizza for 12 to 15 minutes, until it is done. (Generally, cooking time of the ovens differ, so check for the done-ness after 12 minutes)

Delicious home-made pizza is ready. Serve hot. 


Straight from the Oven!


The crust is little thick..


Thin Crust Pizza!
 
Tips Tips Tips…

 For more information on fermenting yeast and raising the dough, kindly refer to my ‘Orange Sugar Bun Recipe’, below is the link:


For Sauce, I generally prefer, Prego 'Traditional', sauce, though I've tried other brands like, Dolmio, Raghu, etc.,


If you want to increase the quantity of Pizza, here’s a suggestion:

 Plain Flour – 2 and ½ Cups

Bread Flour – 2 and ½ Cups

Instant Yeast – 2 to 2&1/2 tsp.

Olive Oil – 4 to 5tbsp.

Sugar – 3 tsp.

Salt – 1 tsp.

Finely Chopped Garlic – 4 Cloves

Parsley Flakes – 1 tsp.

Italian herb mix/Oregano – ½ tsp.

Warm Water – 2 to 3 Cups (as Required)

The above quantiy can yield 3 large Thin Crust Pizzas (or) 5 Pan Pizzas.

Sizes: (approx)
 
Mini - around 6 inches

Medium -  8 to 10 inches

Large - 12 inches

 Flour :

If you don't have Bread flour, you can use just the plain flour.

On the other hand, if you want a whole-meal Pizza, you can use 1 Cup of whole wheat flour/Atta flour and 1 Cup plain flour.


Thursday, 4 April 2013

Garlic Bread and Bruschetta Recipe


Lovely Bruschetta!


Garlic Bread!


Ever since we tried this at ‘Little Italy’ Kota kinabalu, I wanted to make ‘Bruschetta’ at home.  When I tried, it turned out excellent. 

All of us in our family love ‘Garlic Bread’, garlic bread’s new version of Bruschetta, is a great hit among my kids. I’m sure you will love it too..


Ingredients:
 
Fresh Garlic!


Natural Himalayan Pink Salt!


Italian baguette – 1

Butter – 40g

Olive Oil – 2 tbsp.

Whole garlic Pod – 1

Salt – to taste
(I use Natural Himalaya pink salt)

Dried Basil - 2 tsp.

Parsley flakes – 2 tsp.


Garlic Spread!


Brushed with garlic spread, ready to go into oven..


Fresh from Oven..


Garlic Bread!


For Bruschetta:


Veggie mix for Topping.. Wow! Look at the color!
 

Firm (deseeded) Tomato – 1

Capsicum (deseeded) – 1/2

Red Onion – 1

Garlic – 1

Salt – to taste

Olive oil – 2 tsp.


Method:

Garlic Bread:


Preheat oven at 180◦C/350◦F

Cut baguette into circles, peel and pound garlic. Combine butter, crushed garlic, olive oil, parsley flakes, basil and salt well, to make garlic spread.

Brush both sides with garlic spread. Arrange it in a tray and bake in a preheated oven for 8 to 10 minutes, until golden brown.  The rich flavour of garlic bread will fill the entire house.

Crispy Garlic bread is ready to serve.  My kids like to have it with ‘Mushroom Soup’; you can enjoy it as an evening snack as well.


Bruschetta:


Cut tomato, Onion and Capsicum into small cubes and combine with crushed garlic, Olive oil and salt.

Take the garlic bread; top it up with the veggie mix.

Oven fresh Italian Bruschetta is ready to serve.


Lovely Bruschetta!


Tips Tips Tips…

Make sure to do the topping just before you serve, or else the bread will become soggy.


Monday, 11 March 2013

Orange Sweet Buns Recipe


Home-made breads possess unique flavour and texture. The aroma and taste of oven fresh warm breads are unbeatable. Kids absolutely enjoy the whole process - they would love to help you and can’t wait to taste the bread.  You can expect sweet naggings like, is it ready yet?  Is it ready yet, often. When your loved ones enjoy and appreciate your effort in such a loving way, what more do we need as ‘mothers’? Try this and have fun!

Orange Sugar Bun with Jam!

Ingredients:

Freshly squeezed orange Juice


Instant Yeast


Salt


Sugar


Beaten Egg


beaten egg and milk mixture for coating


Bread Improver


Butter


Milk Powder


Bread Flour (Prima Bread Flour) – 2 and ½ Cups
Instant Yeast.

Plain Flour – 2 and ½ Cups

Instant Yeast – 2 tsp.

Milk Powder – 1 tbsp.

Warm water – ½ to 1 Cup as required

Freshly squeezed Orange juice – ½ Cup

Sugar – 3 tbsp.

Bread Improver (Red man brand)


Beaten Egg – 1

(Reserve 2 tsp. of beaten egg mixed with 1 tbsp. of milk for brushing)

Milk – 1 tbsp.

Orange Zest – 1 tsp.

Orange Zest

Glazing:

Sugar – 2 to 3 tsp.

Water – 2 tbsp.

Make slightly sticky syrup by simmering sugar in warm water for few minutes, in low heat.


Method:

Cake mixture and dough hook


In a large bowl, mix plain flour, bread flour, sugar, salt, bread improver, milk powder and yeast.  Add cubed butter and rub in gently. Let the butter combine well with the flour. Toss in the orange Zest, mix well.  Make a whole in the centre and add orange juice and warm water. Knead the dough well, until it becomes elastic and pliable. It will take at least 10 minutes.  Alternatively, you can use a cake mixer, with the dough hook, to knead the dough.  (Usually, for large quantities, I use dough mixer, otherwise I knead it manually) Cover the dough with a towel or plastic wrap and keep it in a warm place. We should allow the dough to ferment and yeast will take care of this.  For the yeast to take action it needs sugar and warmth, that’s why we add warm water. It might take 1 hour or even less, when the climate is sunny, if it’s cold, it may take longer, say 2 hours or more.  But in Singapore, I haven’t had any problems, even during rainy days, thanks to DCL yeast. (I’ve tried few other brands, but nothing can be compared to DCL) With DCL yeast, it’s been a smooth sailing so far. I always make sure I stock up DCL yeast, which I normally buy from Mustafa Centre, Singapore.

Dough ready for 1st raising


Doubled up dough


Punched down dough


Rolled into small balls

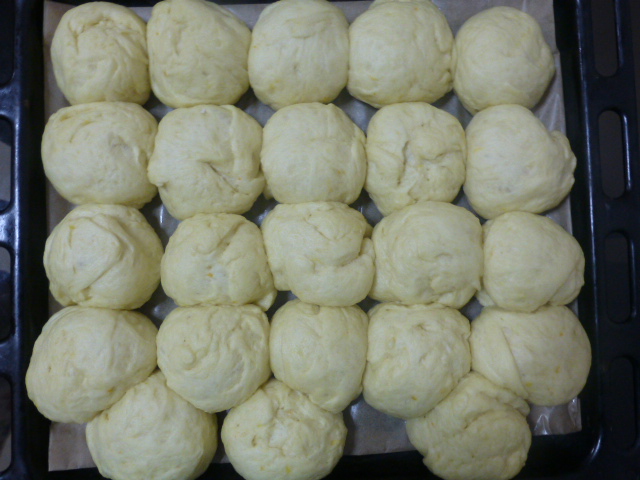
After the dough has doubled up, punch it down and knead it again for few minutes. Divide the dough into equal portions (roughly 16 to 20 for the given quantity) and roll them into small balls.  Place them in a greased oven tray (line the tray with baking sheet or aluminium foil and brush it with oil) and cover for second-raising. Second-raising may not take longer than 1/2 to 1 hour.

Preheat the oven (I use convection oven) to 200 degree.

Brush the raised dough with egg-milk mixture, to get a shiny finish.
After 2nd Raising


Coated with egg-milk mixture, ready to go into the oven

When the oven reaches 200 deg, place the tray in the oven and bake for 12 to 15 minutes. To check the done-ness, you can hear a hollow sound, when tapped. Slit a tooth pick or skewer into the bun and make sure it comes out clean. If dough sticks to it, you can bake few more minutes.

After taking out, coat the buns with sugar glazing and serve.

Fresh from the oven


Ready to go for Sugar Glaze


Sugar Glazed Shiny Buns


Orange Sweet Bun!


Warm, oven fresh orange flavoured buns are heavenly when taken with Jam! If you prefer less sugar, enjoy just as it is!


.